Hosted Checkout
Quickly configure your checkout page to securely accept payments. Pre-built hosted page readily available to integrate with your online website or mobile applications.
Hosted Checkout integration involves two parts: server-side integration and client-side integration. In the client-side integration, you specify non-editable <div> elements for payment information in your checkout flow, maintaining your UI's look and feel. Our SDK then replaces these with a secure iframe that captures card data. When our SDK is called from your client, the card data is sent to our servers, transactions are processed and transient tokens are issued.
Introduction
Hosted Checkout is a proprietary JavaScript SDK from TNS, designed to provide merchants with an iframe for seamless integration into their ecommerce websites. This integration facilitates secure online payments while keeping sensitive payment data out of the merchant's server. Rather than entering card data directly on the merchant's website, TNS handles the card data, enhancing security and compliance.
How it works
Hosted Checkout integration involves two parts: server-side integration and client-side integration. In the client-side integration, you specify non-editable elements for payment information in your checkout flow, maintaining your UI's look and feel. Our SDK then replaces these with a secure iframe that captures card data. When our SDK is called from your client, the card data is sent to our servers, transactions are processed and transient tokens are issued.
The server-side integration is needed to authenticate your session. You can also use tokens issued by TNS to execute transactions.
What we offer
Pre-built payment form to embed into your checkout flow |
|---|
Simple integration with online web application and mobile application |
Built-in validation of payment fields |
Tokenization allowing a secure token to be returned for future transactions without asking the cardholder to enter their card details again |
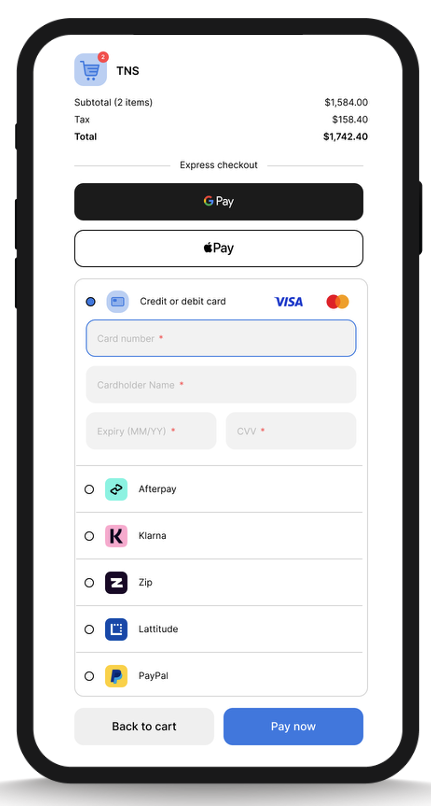
Google Pay, Apple Pay, PayPal and other Global Alternative Payment Methods (APM) |
Embedded Fraud options such as 3DS2 Authentication, Google reCAPTCHA & Address Verification Service (AVS - United States ) |
Sample Hosted Checkout
Integration Steps
1
Start Checkout
When the customer is ready to pay or clicks the checkout button, the merchant's online application requests the checkout page from its server.
2
Create Session
The merchant's server initiates a secure session to the Payment Orchestration Session API, specifying the type of payment transaction amount, display configuration, and merchant credentials, all secured by signing the request with HMAC.
3
Checkout Page
The merchant's server sends the checkout page with the payment form to the online application.
4
Initialized Hosted Checkout
The merchant's online application initializes Hosted Checkout with the specified initialization parameters.
5
Hosted Checkout iframe
Once initialized, the Hosted Checkout SDK replaces the payment form linked to the specified container ID with a Hosted Checkout Iframe that contains elements for capturing payment data.
6
Submit Transaction
The customer enters payment card details into the iframe and clicks Pay button. Hosted Checkout collects card information, processes the transaction and sends the results back to the online application via callbacks.
7
Process Transaction Response
The transaction response received for the transactions, which will contain the transaction identifier that can be used for secondary transactions like void, capture and refunds. See Secondary Transactions for more information.
Using our SDK, you can integrate a payment form in just two steps and begin accepting payments on your website or mobile application.
Step 1 - Create Hosted Checkout Session
When utilizing our Hosted Checkout system, initiate a session and embed our scripts on your webpage. Subsequently, our iframe will automatically render. The initial step involves creating a session. For illustrative purposes, we will showcase this process using our test credentials in the demonstration environment to offer a fundamental example. Please refer to the following cURL request to commence a session. For more information on the request fields or to see the cURL request in multiple languages, see Create Session Request section of our documentation.
This curl request example contains the minimum mandatory fields required to get a successful session.
We have successfully generated our session ID, which will remain active for a period of up to 15 minutes before it expires and cannot be used.
201 Created
{
"sessionId": "cf896190-32fb-44d5-819e-7f9eb0ec8f2f"
}
Step 2 - Create a sample HTML page to embed the Hosted Checkout iframe
Now we need to create a basic HTML page to embed our checkout iframe. This involves incorporating script references and a '' element to showcase the iframe. Let's proceed by creating an HTML page titled index.html. Subsequently, let's insert the specified script references within the '' segment of our page. It is imperative to substitute [YOUR_SESSION_ID] with the session ID obtained from the API request mentioned earlier. The containerId can be any chosen ID, as long as it corresponds to the ID of the '' designated for displaying the iframe. Our example operates in the UAT environment, with en_US as the selected locale.
Now add the following HTML to the '' section of our page. Make sure the id of the '' matches the containerId used above.
<!DOCTYPE html>
<html lang="en">
<head>
<meta charset="UTF-8" />
<title>Hosted Checkout Demo</title>
<!-- Initialize exports -->
<script>
var exports = {};
</script>
<!-- Hosted Checkout SDK -->
<script src="https://checkout.uat.pay.tnsi.com/sdk/index.js"></script>
<!-- Demo Script -->
<script>
document.addEventListener("DOMContentLoaded", function () {
var hostedCheckoutSdk = new exports.HostedCheckoutSDK();
hostedCheckoutSdk.initialize({
containerId: "hosted-checkout",
sessionId: [YOUR SESSION ID],
environment: "uat",
onApprove: function (response) {
console.log(JSON.stringify(response));
// use the response object for subsequent actions
},
onError: function (error) {
console.log(JSON.stringify(error));
// use the error object for subsequent actions
},
onSessionExpired: function (response) {
console.log(JSON.stringify(response));
// use the response object for subsequent actions
},
onSessionError: function (response) {
console.log(JSON.stringify(response));
// use the response object for subsequent actions
},
onInvalidData: function (response) {
console.log(JSON.stringify(response));
// use the response object for subsequent actions
},
onGooglePayAuthorized: function (response) {
console.log(JSON.stringify(response));
// use the response object for subsequent actions
},
onGooglePayCanceled: function () {
// no response object; handle cancellation
},
onGooglePayError: function (error) {
console.log(JSON.stringify(error));
// use the error object for subsequent actions
},
onPaypalAuthorized: function (response) {
console.log(JSON.stringify(response));
// use the response object for subsequent actions
},
onPaypalCaptured: function (response) {
console.log(JSON.stringify(response));
// use the response object for subsequent actions
},
onPaypalCanceled: function () {
// no response object; handle cancellation
},
onApplePayAuthorized: function (response) {
console.log(JSON.stringify(response));
// use the response object for subsequent actions
},
onApplePayCanceled: function () {
// no response object; handle cancellation
},
onApplePayError: function (error) {
console.log(JSON.stringify(error));
// use the error object for subsequent actions
}
});
});
</script>
</head>
<body>
<div id="hosted-checkout"></div>
</body>
</html>Now just use a browser to display the index.html file. You should see the Hosted Checkout Form, and you're ready to submit a test payment.
Step 4 - Handle Transaction Response
You've successfully integrated Hosted Checkout with your checkout process. You'll now receive a response that is sent via the onApprove callback method as configured in the SDK initialization above. Refer to the sample transaction response messages in our API documentation for the API methods.
You can refer to the Parameters & Callbacks page to ensure your application handles negative scenarios with the integration.
That's It, You're Done!
For more detailed information on configuration, formatting options and callbacks, refer to the specific pages within the Hosted Checkout section


On this page
- Hosted Checkout